This is an excerpt from the Carmenta Engine SDK documentation. If you find it interesting, we encourage you to request a Carmenta Engine evaluation to access the rest of the documentation.
Carmenta Engine is a toolkit that helps you develop high performance, interactive 2D and 3D geospatial applications on Windows, Linux and Android. It can access geospatial data in many different formats and makes it easy to include dynamic information such as sensor data in the maps.
The picture below is a screenshot of an aeronautical mission planning system which contains both a 2D and a 3D map window, as well as a vertical profile view. It is a typical example of a Carmenta Engine powered application.
Note that it is only the three map windows that are directly drawn by Carmenta Engine – the rest of the user interface has been custom designed by a software developer like you. (The code behind these other parts of the user interface often call Carmenta Engine API methods to interact with the maps in different ways.)
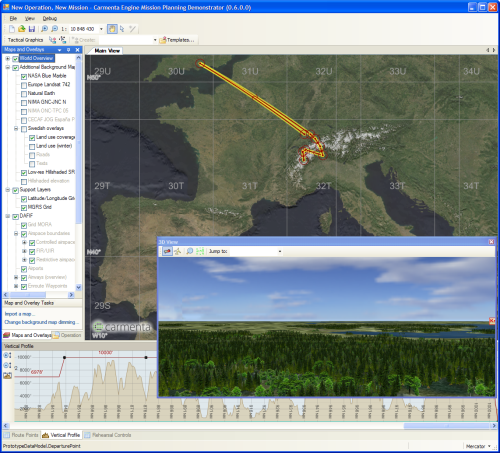
A typical application powered by Carmenta Engine
Different Distributions of Carmenta Engine
The main distribution of Carmenta Engine is the Carmenta Engine SDK (Software Development Kit). This distribution contains all the documentation and tools that software developers need in order to develop, test, debug and tune Carmenta Engine powered applications.
Carmenta Engine Runtime is another distribution of Carmenta Engine that only contains the parts that are needed to run an application – it does not contain any documentation or development tools. The runtime is designed to be deployed together with your own applications.
Carmenta Studio and Carmenta Explorer
One of the most important tools in the SDK is called Carmenta Studio. It is a visual editor for Carmenta Engine map configuration files: Files that describe how the “raw” geospatial data should be transformed into a map on the screen. These files contain information about the data that should be read, the way that the data should be filtered, processed and also how it should be visualized.
Map configuration files, which use the file extension .px, describe maps in terms of interconnected Carmenta Engine objects like Views, DataSets, Layers, Colors, LineStyles etc. As can be seen in the screenshot below, Carmenta Studio provides an interactive visual representation of all such connections between objects. This gives you an easy way to “assemble” a map configuration file, as well as to rearrange its existing contents.
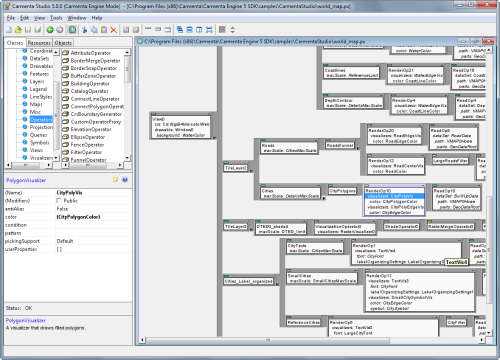
Editing a map configuration in Carmenta Studio
For more information about how a map configuration file is structured, refer to the document How Carmenta Engine Displays a Map.
Carmenta Explorer is another application that is only included in the SDK version of Carmenta Engine. It is a viewer for map configuration files, designed to be used together with Carmenta Studio. There is even a toolbar button in Carmenta Studio which automatically opens the active map configuration file in Carmenta Explorer.
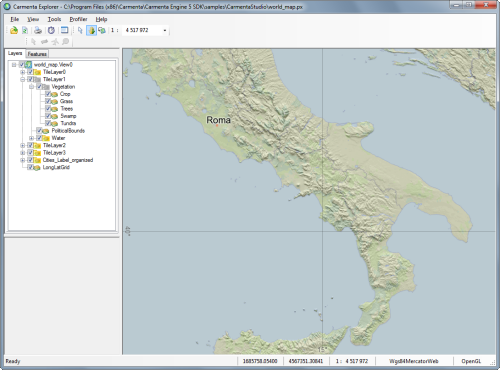
Viewing and testing a map configuration in Carmenta Explorer
As you can see in the picture above, Carmenta Explorer allows you to quickly preview the map you are creating. You can of course turn layers on and off and move around in the map. There is also an easy way to start the Carmenta Engine Profiler and display the performance reports it generates.
The Carmenta Engine API
In order to communicate with Carmenta Engine from your own application, you use the Carmenta Engine API – either from the .NET framework, Java or from C++. There is also a Python version of the API which you can use to write code snippets for custom data processing inside the map configuration files.
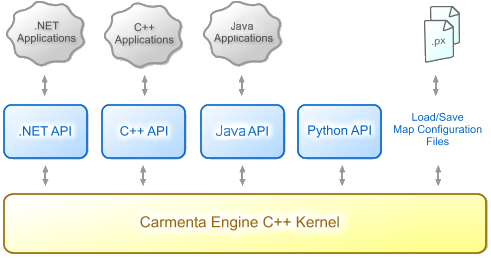
Different ways to access the Carmenta Engine Kernel
The only visual component included in the API is the map control. In the .NET version of the API, both Windows Forms and WPF map controls are available. In the C++ version, the map control is an abstract base class which you subclass and integrate with the UI framework you are using, e.g. QT or MFC.
The purpose of the map control is to provide a way to connect a View – typically defined in a map configuration file – to a map window. It also makes it possible to control what should happen when the user interacts with the map, through a concept called Tools. The Carmenta Engine API includes a number of predefined tools for common operations such as zooming, panning and interacting with objects. You can also create your own tools if you want to customize the interaction.
The screenshot below shows the WPF version of the map control being used in the Visual Studio 2008 WPF designer.
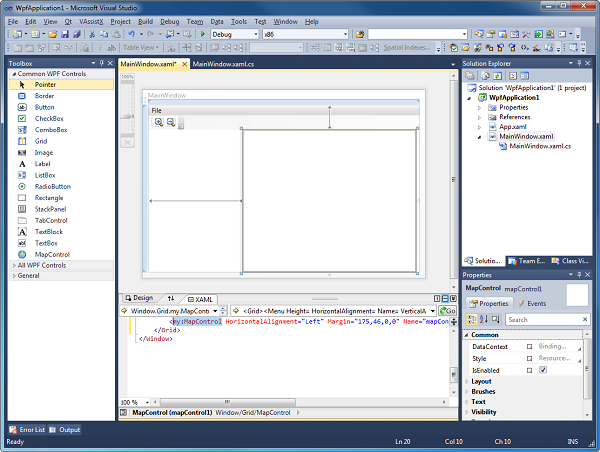
The Carmenta Engine MapControl in the WPF designer
Other common uses of the Carmenta Engine API include:
- Populating a DataSet (e.g. a MemoryDataSet) with geospatial representations of your application data.
- Performing various kinds of geospatial calculations (e.g. calculating the great circle route between two points or reprojecting a point to a different coordinate reference system).
- Modifying properties of the objects that make up the map (e.g. the visibility of a layer or the color of a visualizer).
Note
In most cases you will initialize your application by loading a map configuration file, and then use the API to connect to the objects that were loaded. But it is important to understand that everything that can be configured in Carmenta Studio can also be done via the API.
You are not restricted to simply modifying existing objects – you can easily create new objects and connect them together to form new parts of the configuration, e.g. to let the end user add new data sources dynamically. The object model used by the API is exactly the same as the model you have access to in Carmenta Studio.
The Typical Carmenta Engine Development Process
The image below is an attempt to illustrate the way you use Carmenta Studio, Carmenta Explorer and your own application together during development of your Carmenta Engine powered application.
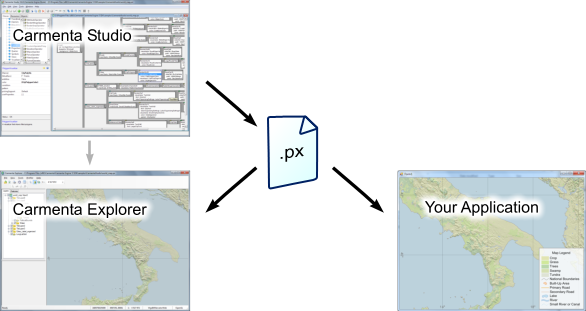
How Carmenta Studio, Carmenta Explorer and your application are used together during development
The following six steps are almost always performed when creating a new application using Carmenta Engine:
- Use Carmenta Studio to make a map configuration that reads and visualizes your map data.
- Test and tune your map configuration with the help of Carmenta Explorer.
- Add one of the Carmenta Engine map controls to your application UI.
- Load the map configuration into the application, and connect its view to the map control.
- Use the Carmenta Engine API to control the map and add all other geospatial objects that should be part of the presentation.
When the time comes to deploy the application, include the Carmenta Engine Runtime in the application’s installation program
Where to Go Next
The sample applications and map configuration files which are included in the Carmenta Engine SDK installation are a good source of inspiration for new users. You can find more information about them in the samples overview document in the Carmenta Engine SDK documentation.
When creating map configurations for your application, you will spend a lot of time in Carmenta Studio. Carmenta Studio is a powerful environment, and to get the most out of it we recommend that you take a look at the Carmenta Studio User’s Guide in the SDK. When you are working in Carmenta Studio, remember that you can always jump directly to the reference manual for the currently selected object by pressing F1 or clicking the help icon.
When you are accessing the Carmenta Engine API from your application, you will want to have the reference manual within easy reach. There are reference manuals for the .Net interface, the Java interface, the C++ interface and the Python interface.
By far the quickest way to find reference documentation for a certain object is to use the Index tab in the left part of the SDK documentation viewer. Type the first few characters of the object name and then select the appropriate entry from the list. Another feature that is useful when navigating the documentation is the Locate button in the toolbar. Pressing the Locate button synchronizes the Contents with the currently opened page. If the page is part of the reference manuals, this allows you to see the inheritance hierarchy of the object directly in the Contents tab.
Finally we’d like to remind you that if you encounter any problems or have questions about Carmenta Engine, you are always welcome to contact our friendly support.